
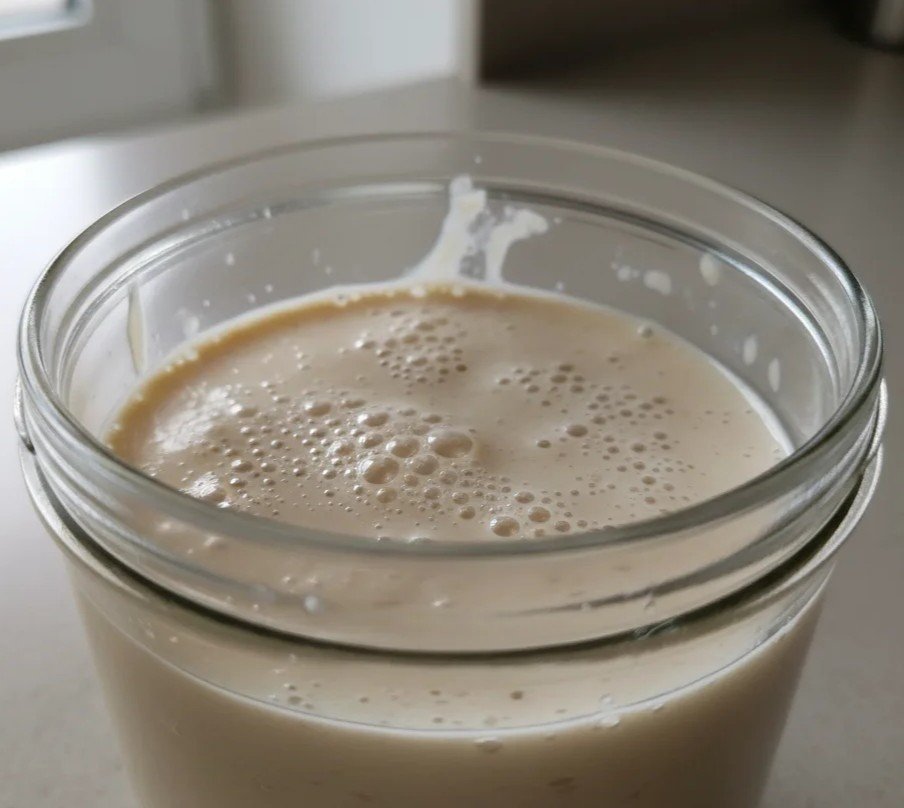
Making your own sourdough starter recipe from scratch is one of the most rewarding experiences for any home baker. With just flour, water, and a little patience, you can create a living culture that allows you to bake naturally leavened bread with incredible flavor, texture, and nutrition.
This step-by-step guide on how to start a sourdough starter is designed especially for beginners. No commercial yeast, no fancy equipment—just simple ingredients and daily care. By the end of this article, you’ll have an active, bubbly sourdough starter ready for baking delicious homemade sourdough bread.
Recipe Overview
| Recipe Name | Sourdough Starter |
|---|---|
| Prep Time | 5 minutes per day |
| Total Time | 5–7 days |
| Ingredients | Flour, water |
| Difficulty Level | Beginner |
| Cuisine | Traditional / Artisan Baking |
| Yield | 1 active sourdough starter |
What Is a Sourdough Starter Recipe?
A sourdough starter is a fermented mixture of flour and water that captures wild yeast and beneficial bacteria from the environment. These natural microorganisms cause dough to rise and give sourdough bread its signature tangy flavor.
Unlike store-bought yeast, a sourdough starter is alive and needs regular feeding to stay healthy. Once established, it can last for years—or even decades—when properly cared for.
History and Origin of Sourdough
Sourdough is one of the oldest forms of bread-making in the world, dating back over 5,000 years to ancient Egypt. Before commercial yeast was invented, bakers relied on wild fermentation to leaven bread.
Sourdough gained massive popularity during the California Gold Rush, where miners depended on starters for bread in harsh conditions. Today, sourdough is celebrated globally for its traditional roots, digestibility, and deep flavor.
Why Make Your Own Sourdough Starter Recipe?
Making a sourdough starter at home offers several benefits:
- No commercial yeast required
- Better digestion due to natural fermentation
- Rich, complex flavor
- More control over ingredients
- Cost-effective and sustainable
Once you have a starter, you can make bread, pancakes, waffles, pizza dough, crackers, and more.
Ingredients for Sourdough Starter Recipe
| Ingredients for Sourdough Starter Recipe | Quantity |
|---|---|
| Whole wheat flour or all-purpose flour | 1 cup (total over days) |
| Filtered water (room temperature) | ½ cup (total over days) |
Tip: Whole wheat or rye flour ferments faster due to higher natural yeast content.
Equipment You’ll Need
- Glass jar or container
- Spoon or spatula
- Kitchen scale (optional but helpful)
- Breathable cover (cloth or loose lid)
- Rubber band or marker
How to Start a Sourdough Starter recipe
Day 1: Create the Base
In a clean glass jar, mix:
- ½ cup flour
- ¼ cup water
Stir until thick and smooth, like pancake batter. Cover loosely and place at room temperature (22–26°C / 72–78°F).
Day 2: First Signs of Life
You may see small bubbles or smell a slightly sour aroma. This is normal.
Discard half of the mixture, then add:
- ¼ cup flour
- 2 tablespoons water
Mix well and cover again.
Day 3: Active Fermentation
Your starter may rise and fall, develop more bubbles, or smell tangy. Don’t worry if it smells odd—it will stabilize soon.
Discard half and feed again with:
- ¼ cup flour
- 2 tablespoons water
Day 4–5: Strength Building
By now, the starter should look bubbly and rise within a few hours after feeding. Continue discarding half and feeding daily.
If your kitchen is cool, it may take an extra day or two.
Day 6–7: Ready to Use
Your sourdough starter is ready when it:
- Doubles in size within 4–6 hours
- Has a pleasant, tangy smell
- Passes the float test (a spoonful floats in water)
Sourdough Starter Recipe
Ingredients
Equipment
Method
- In a clean glass jar, mix:
- ½ cup flour
- ¼ cup water
- Stir until thick and smooth, like pancake batter. Cover loosely and place at room temperature (22–26°C / 72–78°F).
- You may see small bubbles or smell a slightly sour aroma. This is normal.
- Discard half of the mixture, then add:
- ¼ cup flour
- 2 tablespoons water
- Mix well and cover again.
- Your starter may rise and fall, develop more bubbles, or smell tangy. Don’t worry if it smells odd—it will stabilize soon.
- Discard half and feed again with:
- ¼ cup flour
- 2 tablespoons water
- By now, the starter should look bubbly and rise within a few hours after feeding. Continue discarding half and feeding daily.
- If your kitchen is cool, it may take an extra day or two.
- Your sourdough starter is ready when it:
- Doubles in size within 4–6 hours
- Has a pleasant, tangy smell
- Passes the float test (a spoonful floats in water)
Notes
How to Use Sourdough Starter Recipe
Once active, use your starter to make:- Sourdough bread
- Pancakes and waffles
- Pizza dough
- Cinnamon rolls
- Crackers
Understanding the Science Behind Sourdough Fermentation
Sourdough fermentation is a natural process driven by wild yeast and lactic acid bacteria present in flour and the surrounding environment.
When flour and water are combined, these microorganisms begin to feed on the natural sugars found in the flour.
Over time, they multiply and create carbon dioxide gas, which helps bread rise, along with organic acids that contribute to sourdough’s signature flavor.
This slow fermentation process not only improves taste but also breaks down gluten and phytic acid in the flour, making sourdough bread easier to digest for many people. Understanding this science helps beginner bakers feel more confident and patient during the starter-building process.
Best Temperature and Environment for a Sourdough Starter
Temperature plays a crucial role in how quickly and successfully your sourdough starter develops. The ideal room temperature for fermentation is between 22–26°C (72–78°F). In cooler kitchens, the starter may take longer to show activity, while very warm temperatures can cause it to ferment too quickly.
Place your starter in a draft-free spot away from direct sunlight, such as inside a cabinet or on a kitchen counter. Consistency is key—keeping your starter in the same location helps maintain steady fermentation and predictable results.
What Does a Healthy Sourdough Starter Recipe Look Like?
A mature starter should be:
- Light and bubbly
- Slightly stretchy
- Mildly sour but not unpleasant
- Able to rise consistently
A layer of liquid (called hooch) means it’s hungry—just feed it.
Feeding and Maintaining Your Starter
Daily Feeding/Room Temperature
- Discard half
- Feed with equal parts flour and water
Weekly Feeding/Refrigerator
- Store in fridge
- Feed once a week
- Bring to room temperature before baking
Common Sourdough Starter Recipe Problems
The starter smells bad:
Too much bacteria; discard and feed regularly
No bubbles:
Kitchen too cold; move to warmer spot
Mould appears:
Discard immediately and start over
Tips for Sourdough Starter Recipe Success
- Use filtered or dechlorinated water
- Keep jar clean
- Be consistent with feeding
- Don’t rush the process
- Name your starter (optional but fun!)
How to Use Sourdough Starter Recipe
Once active, use your starter to make:
- Sourdough bread
- Pancakes and waffles
- Pizza dough
- Cinnamon rolls
- Crackers
You’ll usually need active starter, fed 4–6 hours before baking.
Storage and Shelf Life
- Room Temperature: Feed daily
- Refrigerator: Feed weekly
- Long-term: Dry or freeze starter
A well-maintained starter can last indefinitely.
Frequently Asked Questions
Can I use all-purpose flour?
Yes, but whole wheat or rye works faster.
Why discard starter?
Discarding keeps the yeast balanced and prevents overflow.
Can I use tap water?
Only if chlorine-free; otherwise, use filtered water.
Is sourdough healthier?
Yes, fermentation improves digestion and nutrient absorption.
Final Thoughts: Your Sourdough Journey Begins
Learning how to start a sourdough starter is more than a recipe—it’s the beginning of a timeless baking tradition. With patience, consistency, and care, your starter will reward you with incredible homemade bread and baked goods.
Once your starter is ready, you’ll never look at store-bought bread the same way again. Happy baking!
You will also like the Pimento Cheese Recipe
